
In this article, we provide a detailed, step-by-step guide on how to install Cisco VPN Client V.5.0 on Windows. Whether you are an IT professional or a remote worker, our guide is designed to offer a clear and comprehensive walkthrough that ensures your VPN installation is smooth and secure. Our goal is to empower you with the necessary knowledge to connect to your organization’s network confidently.
1- Understanding the Importance of a VPN and Cisco VPN Client
A Virtual Private Network (VPN) is essential for ensuring secure communication over the internet, especially when dealing with sensitive data. Cisco VPN Client V.5.0 has been a trusted solution for many organizations for its robust security features and reliability. By creating an encrypted tunnel between your computer and your network, the VPN protects your data from prying eyes, ensuring that your online activities remain private and secure. Also, an additional layer of security is included as you will need to authenticate in order to access data.
For Windows 10 users, installing this client can sometimes be challenging due to compatibility issues and driver problems. In our guide, we address these common hurdles with detailed instructions that are easy to follow.
2- Prerequisites and System Requirements
Before you begin the installation process, we recommend ensuring your system meets the following prerequisites:
- Windows 10 Operating System: Ensure that your computer is running a compatible version of Windows 10.
- Administrator Rights: You must have administrative privileges to install the Cisco VPN Client.
- Stable Internet Connection: A reliable internet connection is necessary to download the software and any additional updates.
- Download Cisco VPN: download the following Cisco VPN client tools that will enable the VPN to needful for the user.
- Cisco VPN Client Fix x64 setup file. Click here to Download
- Citrix DNE Update Setup File. Click Here to Download
- Cisco VPN Client 5.0.07.0440 Setup File. Click Here to Download
- Latest Windows Updates: Keeping your Windows 10 updated can resolve driver conflicts and ensure smoother operation of the VPN client.
3- Step-by-Step Installation Process
Once you meet all the requirements, you will be able to start installing and configuring the VPN client on your Windows 10 PC by taking the following steps:
Step1: Downloading the Cisco VPN Client Installer
Ensure that you download the correct version of Cisco VPN all related stuff mentioned above for Windows . If your organization provides a specific version, follow their guidelines to ensure compatibility.
Step2: Uninstall Cisco VPN Client already installed from PC
Uninstall Install any Cisco VPN client if already installed on PC From Control Panel – then reboot system.

Step3: Preparing for Installation
Once the installer is downloaded, we suggest performing the following preparations:
- Disable Antivirus Temporarily: Some antivirus programs might interfere with the installation. Disable them temporarily to avoid false positives.
- Close Unnecessary Applications: To prevent any conflicts during installation, close all other running applications.
- Backup Your System: It is always a good idea to create a system restore point before making significant changes to your system.
Step 4: Following the Installation Wizard of Cisco VPN Client Fix x64 setup
The Cisco VPN Client installer is designed to be user-friendly. During the installation process, pay attention to the following steps:
- License Agreement: Read through the license agreement carefully, then click Accept to proceed.
- Installation Location: Choose the desired installation location. The default path is usually acceptable for most users.
- Custom Installation Options: Some versions of the Cisco VPN Client may offer custom installation options. We recommend keeping the default settings unless your IT department specifies otherwise.
- Completing the Installation: Click Install to begin the process. The installation wizard will display a progress bar; do not interrupt the process.

Step-5: Install Citrix DNE Update Setup File
Install Citrix DNE Update software to install and configure Virtual Network Adapter settings. but make sure that it matches your computer’s architecture (32-bit or 64-bit).
- Go to location where DNE setup file was downloaded.
- Double Click installation file.
- do the procedure as steps are showing on wizard screen.
- once installation completed , then Reboot PC.

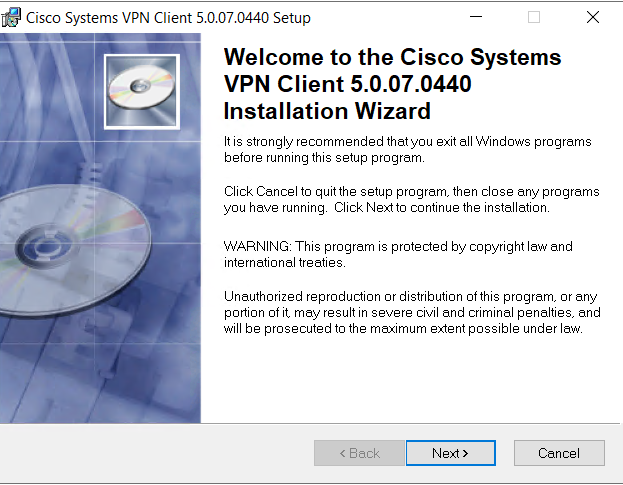
Step 6: Install Cisco VPN Client 5.0.07.0440 Setup
Before this step first two steps were pre-requisites installation. Now Install Cisco VPN client version 5.0.07.0440 on your PC.
- Go to location where Cisco VPN Client Version 5.0.07.0440 setup file was downloaded.
- Double Click installation file.
- Follow the Procedural steps as are showing on wizard screen.
- once installation completed , then Reboot PC.
4- Post-Installation Configurations
This is final Step of Cisco VPN Client Installation Process. Now yow will open Windows Registry Editor . To launch it do as following. Press Windows Button from keyboard then type/write regedit and click on it from menu. or press shortcut key Windows + R.

Press Windows Button from keyboard then type/write regedit and click on it from menu. or press shortcut key Windows + R

Once Regedit Window is open
Go to HKEY_LOCAL_MACHINE << SYSTEM << ControlSet001 << Services << CVirtA
Search for Display Name Key , Double click it to edit the entry.
Change From or remove extra text before Cisco Systems VPN Adapter

Windows Registry Editor Screen@oem8.ifn,%CVirtA_Desc%;Cisco Systems VPN Adapter to Cisco Systems VPN Adapter;

Once Changes done then close the Registry Editor.
Go to Windows start menu launch the Cisco VPN Client Software and configure it to connect to your VPN server. or if you are provided cisco VPN configuration certificate file then import and connect with given credentials.
If the latest Windows updates prevent the app from working as it should, Cisco recommends using their AnyConnect Mobility client, which offers a VPN client and other solutions in one package.
Conclusion: How to Install Cisco VPN Client V.5.0 on Windows
In summary, installing the Cisco VPN Client V.5.0 on Windows 10 may present some challenges, but with the right approach and thorough understanding, we can overcome these obstacles. By following our detailed installation guide, performing necessary system preparations, and adhering to best practices, you can ensure a secure and efficient VPN connection. Our comprehensive guide not only simplifies the installation process but also provides advanced troubleshooting and customization tips to enhance your VPN experience.
We trust that our guide will empower you to install and configure the Cisco VPN Client with ease. With a secure connection in place, you can work remotely with confidence, knowing that your data remains protected against potential threats. By leveraging these detailed instructions, you are well on your way to a smoother, more secure VPN experience on your Windows 10 system.
By implementing these best practices and following our installation guide step-by-step, you are investing in a more secure and productive work environment. Enjoy the benefits of a reliable VPN connection that protects your data and enhances your remote work experience.



![How to Set Up Mail Forwarding in Procmail on Ubuntu? [Step-by-Step Guide]](https://a2zeducate.com/wp-content/uploads/2025/03/Procmail-on-Ubuntu-1-150x150.png)